
How to Fix Chimney Flashing Leaks in Louisiana (DIY vs. When to Call a Pro)
Chimney flashing is the most common single source of roof leaks on Louisiana homes 8+ years old. The fix that lasts is rarely a tube of caulk. A proper repair runs $300-$1,500 depending on severity; a DIY caulk-only "repair" lasts about 12 months before the same leak returns. The difference between the two is whether the underlying flashing assembly gets addressed or just the visible sealant. Knowing which approach the leak actually needs is what separates a permanent fix from an annual ritual.
There's a brown stain on the bedroom ceiling about three feet from the chimney chase. Last summer, it was on the den ceiling. The summer before that, the same spot in the bedroom. Each year, a roofer or handyman shows up, runs a bead of sealant along the chimney flashing, and the leak goes away — until the next heavy rain twelve months later.
Most chronic chimney leaks follow that pattern. The visible repair addresses a symptom; the underlying flashing assembly fails, gets temporarily concealed, and resurfaces on its own schedule. Permanent chimney flashing repair requires understanding what the flashing actually is, why it failed, and which fix actually solves the problem versus which one delays it. The difference is roughly $200 in repeated band-aid spending versus a $500-$1,500 one-time fix that lasts 15+ years.
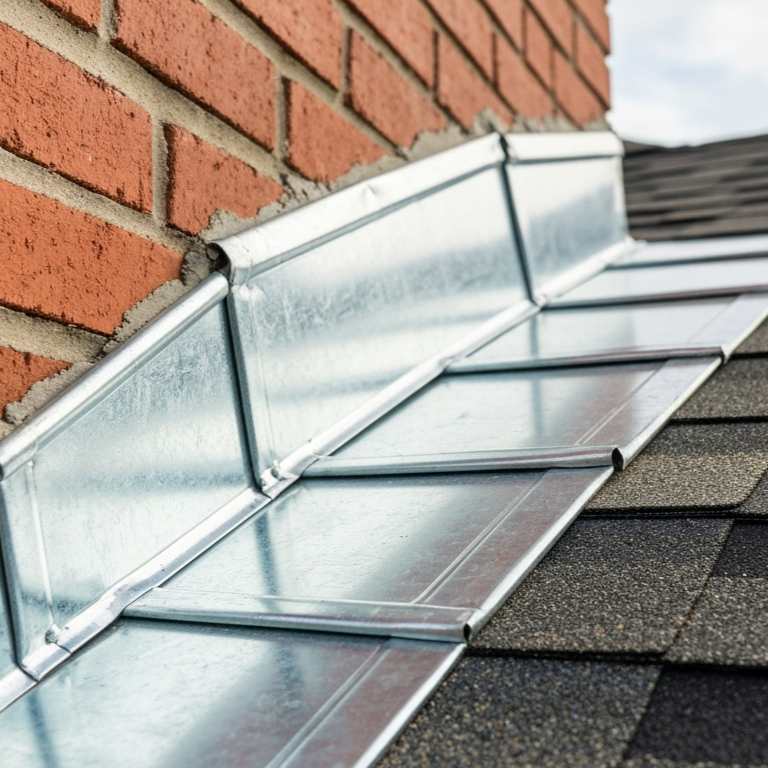
New chimney step flashing and counter flashing installed against asphalt shingles to prevent roof leaks and water intrusion around masonry chimney.
Chimney Flashing Anatomy in Plain English
Chimney flashing isn't one piece of metal. It's a layered assembly of three (sometimes four) components that work together to keep water out of the joint where the chimney meets the roof. Knowing which piece does what is the difference between an effective repair and a decorative one.
Step flashing
Individual L-shaped pieces of metal interwoven with the roof shingles along the sides of the chimney. Each L-piece is bent at 90 degrees, with one leg under a shingle and the other leg vertical against the chimney face. They install in a stair-step pattern — one piece per shingle course — so water flowing down the roof gets directed onto the next shingle below rather than into the chimney joint.
Counter flashing (also called cap flashing)
A second layer of metal that covers the vertical legs of the step flashing. Counter flashing typically embeds into a groove cut into the chimney's mortar joints, then bends down to overlap the step flashing. The two layers don't seal against each other — they overlap, like shingles, so water running down the chimney face can't find a horizontal seam to slip behind.
Apron flashing (front)
A single piece of L-shaped metal at the front (downslope) face of the chimney. The horizontal leg sits over the shingle below the chimney; the vertical leg covers the chimney face. This piece takes the most direct water hit — anything flowing down the upslope side of the chimney lands here.
Cricket or saddle (when present)
A small triangular ridge built behind the upslope side of wider chimneys to divert water around the chimney rather than letting it pool against the back face. The International Residential Code (IRC R1003.20) requires a cricket or saddle on any chimney 30 inches wide or wider on the high side of the roof. Older Louisiana homes (pre-2000) often have wide chimneys without crickets — a missing cricket is a permanent water source against the chimney back wall and a common source of chronic chimney leaks.
The single most important thing to understand about chimney flashing: the system relies on OVERLAP, not sealant. Properly installed step and counter flashing will shed water with no sealant at all because the layered geometry directs water out instead of trapping it. When the assembly geometry fails — pieces lifting, mortar joints opening, counter flashing pulling out of its groove — sealant becomes a band-aid that delays but doesn't prevent the leak. Permanent repair restores the geometry; band-aid repair just hides the symptom.
Why Chimney Flashing Fails on Louisiana Homes
Most chimney flashing failures fall into one of four categories. Knowing which one is in play determines whether a small reseal works or whether the whole assembly needs replacement.
Sealant aging
Original sealant beads at the counter-flashing-to-chimney joint or at flashing seams degrade in Gulf Coast UV. Manufacturer technical bulletins typically rate exterior polyurethane and silicone sealants for a 10-20 year service life under standard conditions. Louisiana sun cuts that to 3-7 years for most installations. Visible signs: sealant pulling away from the metal or masonry, cracks running along the bead line, missing chunks where the sealant has dried out and broken off.
Wind uplift after storm events
Hurricane-force or tropical-storm wind events lift counter flashing edges that aren't fully seated in their masonry groove or that are held in place by sealant alone. Once lifted, the counter flashing flaps in subsequent wind events and progressively pulls away from the chimney face. After a major storm, chimney flashing should be inspected even when the rest of the roof looks intact — wind concentrates on tall protrusions like chimneys.
Mortar joint deterioration
Counter flashing embedded into chimney mortar joints can fail when the mortar itself deteriorates. Older Louisiana brick chimneys (pre-1990) commonly have 30+ year-old mortar with significant degradation. When the mortar crumbles, the counter flashing loses its anchorage and pulls out. Repair in this case requires tuckpointing (mortar joint repair) in addition to flashing work.
Wrong material or installation
Mixing incompatible metals causes galvanic corrosion. Copper flashing fastened with galvanized nails will accelerate corrosion at the fastener points. Aluminum flashing embedded in fresh mortar can react with the alkali content and degrade. These mistakes show up as premature corrosion, staining, or holes appearing in flashing that should still have years of service life. Most Louisiana residential chimney flashing is aluminum or coated aluminum — verify with the original installer if possible before adding new metal components.
How to Tell Chimney Flashing Is the Actual Problem
Not every leak near a chimney is a chimney flashing problem. A leak appearing in the ceiling near a chimney could come from chimney flashing, the chimney crown, the chimney cap, mortar joint failure, or even an unrelated roof issue with water tracking down the rafters from elsewhere.
Signs the chimney flashing IS the problem
Visible gaps or lifts in the metal flashing pieces. Sealant cracking or pulling away. Counter flashing pulled out of the mortar groove. Active dripping during heavy rain that stops within hours of the rain ending. Brown ceiling stain located within 3-5 feet of the chimney chase, on the slope side closest to the chimney. Damp insulation or stained decking visible in the attic directly behind the chimney chase.
Signs the leak is something other than flashing
Cracks visible in the chimney crown (the concrete or masonry slab on top of the chimney). Missing or damaged chimney cap (the cover over the flue opening). White efflorescence (salt deposits) on the chimney bricks indicating water absorption through the masonry. Water stains that appear days after rain rather than during rain (suggests slow water absorption through masonry rather than direct flashing leak). Leaks that show up in rooms well away from the chimney chase (suggests water tracking along rafters from another entry point).
Spending money to re-flash a chimney when the leak is actually coming through a cracked crown is the most common diagnostic mistake. Crown failures and flashing failures both produce "chimney leaks," but the fixes are completely different. A professional inspection should explicitly identify which component is failing before any repair work starts. If the diagnosis comes back as "reseal the flashing" without checking the crown and cap, get a second opinion.
DIY Chimney Flashing Repair — When the Math Works
Most chimney flashing work is not a reasonable DIY project. The combination of fall risk, specialized materials, and the high cost of a wrong fix puts it firmly in professional territory. But a small subset of repairs is within reach for a homeowner comfortable working on a roof with proper safety equipment.
DIY makes sense for: small sealant cracks at the counter flashing-to-chimney joint where the underlying metal is still well-seated and intact. The fix is removing the old sealant, cleaning the joint, and applying a fresh bead of high-quality polyurethane or silicone sealant. Materials cost $20-$40. The time required is about an hour. The repair lasts 3-5 years on average in the Louisiana sun before the sealant ages out again.
DIY does not make sense for: lifted counter flashing, missing step flashing, mortar joint failure, masonry repair, or any condition where the flashing geometry has been compromised. These failures require flashing replacement or substantial flashing work, neither of which is a homeowner-grade project. Amateur attempts at flashing replacement reliably create bigger leaks within 12-24 months because the layered overlap geometry is easy to get wrong and impossible to fix without redoing the whole assembly.
| Repair Scenario | DIY Approach | Pro Approach |
|---|---|---|
| Small sealant crack at counter flashing | Reseal: $20-$40, ~1 hour, 3-5 yr life | $200-$400 reseal w/ inspection |
| Lifted counter flashing edge | Not recommended | $400-$800 partial reset |
| Missing step flashing piece | Not recommended | $500-$1,000 selective replacement |
| Full flashing replacement | Not recommended | $800-$1,500 complete reflash |
| Mortar joint deterioration + flashing | Not recommended | $1,000-$2,500 (tuckpoint + flash) |
| Missing cricket on wide chimney | Not recommended (code work) | $800-$2,000 cricket install |
OSHA fall protection requirements apply to any work above 6 feet. Chimney work typically happens at 12-25+ feet on a residential roof. Personal Fall Arrest Systems run $200-$500 and require training to use safely. A homeowner attempting DIY chimney flashing work without fall protection is taking on a risk that the project's $200-$400 savings do not justify. Falls from chimney work cause some of the most serious DIY home repair injuries annually.
The 5 DIY Mistakes That Make Flashing Leaks Worse
When DIY chimney flashing repair fails, it usually fails in one of five specific ways. Knowing the failure modes in advance is the difference between a repair that buys 5 years and one that creates a worse problem within 12 months.
1. Caulk-only "repair" over a structurally failed flashing
Running a thick bead of caulk or roofing cement over visible flashing damage hides the problem temporarily but doesn't fix it. The underlying flashing keeps moving with thermal expansion and wind events; the caulk cracks within 12 months; the leak returns. The permanent fix requires resetting or replacing the flashing assembly itself.
2. Wrong sealant choice
Using interior-grade caulk, wood glue, or any sealant not rated for exterior masonry-to-metal joints. The wrong sealant fails within months of application — pulling away from one or both surfaces and creating a fresh water entry path. Use polyurethane or silicone sealant rated for exterior masonry use, applied to clean, dry surfaces.
3. Mixing incompatible metals
Adding new aluminum flashing pieces against existing copper or vice versa. Galvanic corrosion accelerates at the contact points, causing premature failure of both metals. Replacement metal should match the existing metal type, and fasteners should match too — copper flashing requires copper nails; aluminum flashing requires aluminum or coated fasteners.
4. Fasteners through shingles instead of into rafters
Driving roofing nails or screws through the visible shingle surface to anchor flashing. The fasteners create new water entry paths through the shingles, and they don't bite into structural wood (the rafter beneath), so they pull out under wind load. Proper fasteners go through the flashing into the chimney's mortar joints (for counter flashing) or are covered by overlapping shingles (for step flashing).
5. Reseal applied to dirty or wet surfaces
Sealant adhesion requires clean, dry surfaces. Old sealant, dirt, oxidation on the metal, or any moisture in the joint prevent the new sealant from bonding. The result is a sealant that visually appears intact but isn't actually adhered to the underlying surfaces. Surface prep — wire brushing the old sealant off, cleaning with isopropyl alcohol, drying thoroughly — is what separates a 5-year reseal from a 12-month one.
When Calling a Pro Is the Right Move
Five conditions move chimney flashing work decisively into professional territory. Any one of them is a reason to skip the DIY attempt entirely.
Lifted, displaced, or missing flashing components. Once the layered overlap geometry has been compromised, sealant alone cannot restore the watertight seal. Flashing pieces must be reset or replaced, which requires removing the shingles and properly reassembling them.
Mortar joint failure. Counter flashing embedded in deteriorated mortar requires tuckpointing or repointing before the flashing can be properly reset. Mortar work is masonry-trade skilled labor — not a homeowner project.
Two-story home or steep-pitch roof. Fall risk above 12 feet without proper fall protection and training is substantial. Most Northshore single-story homes have 12-15 foot eaves; two-story homes run 18-22 feet to the eave with the chimney several feet higher.
Recurring chimney leak. A leak that has been "fixed" once and returned within 1-3 years indicates either the wrong diagnosis (it isn't really the flashing — could be the crown, cap, or masonry) or a failed repair attempt. Repeat leaks need a fresh diagnostic pass, not another caulk application.
Storm-related damage with potential insurance claim. Chimney flashing damage tied to hurricane wind, falling tree limbs, or severe thunderstorms may be covered under a homeowner's policy. Pro inspection produces the documentation needed for the claim — a DIY repair eliminates the claim option by obscuring the original damage state.
Real Louisiana Cost Ranges (2026)
Chimney flashing repair pricing in Louisiana runs ~10-20% below national averages due to lower regional labor rates. The numbers below reflect typical 2026 Northshore and Greater New Orleans pricing from licensed Louisiana contractors.
| Repair Type | Louisiana 2026 Cost |
|---|---|
| Sealant-only reseal (existing flashing intact) | $200-$400 |
| Partial flashing reset (1-2 lifted pieces) | $400-$800 |
| Selective step flashing replacement | $500-$1,000 |
| Full flashing replacement (step + counter + apron) | $800-$1,500 |
| Flashing + mortar tuckpointing combined | $1,000-$2,500 |
| Flashing + cricket installation (wide chimney) | $1,200-$2,500 |
| Full chimney flashing rebuild + minor masonry | $1,500-$3,500 |
| Major chimney rebuild (mortar + crown + flashing) | $3,000-$8,000+ |
Three factors push the final number above the table ranges. Multi-story access adds 20-30% for setup, ladder work, and fall protection. Stone or large brick chimneys (uncommon in residential Louisiana but present on some older Greater New Orleans homes) run higher due to specialty masonry skill required. Storm-season emergency premium adds 30-50% for after-hours or same-day response during active hurricane windows.
Most chimney flashing repairs fall under the Louisiana State Licensing Board for Contractors (LSLBC) $7,500 licensing threshold, which means unlicensed handymen can legally perform the work. The catch: unlicensed repairs don't carry the insurance protection that licensed contractor work does. If a leak repair below $7,500 fails or causes secondary damage, the homeowner's recourse against an unlicensed worker is limited.
The Permanent Fix Process — What Pros Do Differently
Professional chimney flashing repair follows a sequence designed to address the root problem rather than the visible symptom. The process is identifiable from the outside — skipping any of these steps is a red flag.
Step 1: Diagnostic inspection. The roofer identifies which component is failing — flashing, crown, cap, mortar, or some combination. Photo documentation of each finding. A diagnosis of "reseal the flashing" without inspecting the crown and cap is a shortcut, not a diagnosis.
Step 2: Removal of damaged components. Old sealant, lifted flashing pieces, and any compromised mortar are removed completely. New material adheres to clean surfaces, not to old sealant or oxidized metal.
Step 3: Surface preparation. Wire brushing, solvent cleaning, and drying. This step often takes longer than the actual installation and is the most-skipped part of amateur repairs.
Step 4: Replacement or reset of metal components. New flashing pieces installed in the correct overlap geometry. Counter flashing embedded in chimney mortar joints (cut into the joint with a masonry blade if necessary). Step flashing interwoven with shingles in the proper stair-step pattern.
Step 5: Sealant application as a secondary barrier. High-quality polyurethane or silicone sealant applied at all metal-to-masonry joints — not as the primary waterproofing, but as a secondary defense behind the layered metal geometry. Sealant is the backup; geometry is the primary fix.
Step 6: Leak test. Water runs from a hose against the chimney for several minutes while a second person monitors the attic or interior for any signs of leak. Any failure detected gets addressed immediately rather than discovered during the next storm.
Step 7: Documentation. Before/after photos, materials used, and written warranty terms. The documentation matters for any future warranty claim and for any insurance interaction.
When the Leak Isn't the Flashing — 4 Other Suspects
Several chimney problems produce symptoms that look like flashing leaks but require different fixes.
Cracked chimney crown
The crown is the concrete or masonry slab on top of the chimney that sheds water away from the masonry sides. Crown cracks let water down inside the chimney structure, where it can show up as ceiling stains near the chimney, even though the flashing is fine. Repair: crown sealant for small cracks ($300-$700); crown rebuild for major damage ($800-$2,500).
Damaged or missing chimney cap
The cap is the metal cover over the flue opening at the top of the chimney. A missing or damaged cap lets rain enter the flue directly, where it accumulates in the smoke chamber and causes interior chimney damage that can manifest as leak symptoms. Repair: cap replacement ($150-$500).
Mortar joint failure on chimney sides
Aged mortar between the bricks of the chimney structure can absorb water through deteriorated joints. The water tracks down through the masonry and shows up as ceiling stains near the chimney chase. Visible signs: efflorescence (white salt deposits) on the bricks, crumbling mortar joints, and brick spalling. Repair: tuckpointing ($500-$2,500 depending on extent).
Missing or undersized cricket
On chimneys 30 inches wide or wider on the upslope side, the IRC requires a cricket or saddle to divert water around rather than against the chimney back face. Older Louisiana homes often have wide chimneys without crickets — water collects against the back face, overwhelms the flashing, and produces chronic leaks. Repair: install a cricket ($800-$2,000).
Frequently Asked Questions
Most Louisiana chimney flashing repairs run $300-$1,500. Sealant-only reseals are the cheapest at $200-$400. Full flashing replacement runs $800-$1,500. Combined flashing-and-mortar work or cricket installation can push costs above $2,000. Prices calibrate roughly 10-20% below national averages.
Sometimes. If the metal flashing pieces are still well-seated and intact, a sealant-only reseal at the metal-to-masonry joint is a legitimate repair that buys 3-5 years. If the flashing has lifted, pulled out of the mortar groove, or has missing pieces, partial or full replacement is required. The reseal-vs-replace decision depends on the structural condition of the existing metal, not on the visible sealant condition.
A proper full flashing replacement should last 15-25 years in the Louisiana climate. A sealant-only reseal lasts 3-5 years before the sealant ages out and requires reapplication. A caulk-only repair over a structurally failed flashing typically lasts 6-12 months before the underlying problem produces the leak again.
Storm-related chimney flashing damage (hurricane wind, falling tree, severe thunderstorm) is typically covered minus the deductible. Wear-and-tear flashing failure (sealant aging, mortar deterioration, gradual UV degradation) is excluded from every Louisiana homeowner's policy. The cause determines coverage. Document any storm-related damage with photos before any repair work begins.
Step flashing replacement requires lifting the surrounding shingles to remove the old step flashing pieces and slide the new ones into the same interwoven pattern. The shingles themselves usually don't need replacement — they get lifted, the work happens underneath, and they get reset. Counter flashing replacement doesn't require shingle work because it sits on the chimney face above the shingle line.
Step flashing is the L-shaped pieces interwoven with shingles along the sides of the chimney — they sit between the shingles and the chimney face. Counter flashing is the second layer of metal that covers the vertical legs of the step flashing and embeds into the chimney's mortar joints. The two layers overlap (like shingles) to shed water without relying on sealant for the primary watertight seal.
DIY makes sense only for small sealant cracks where the underlying flashing metal is still well-seated and intact. Anything involving lifted flashing, missing pieces, mortar work, or chimney access above one story is not a reasonable DIY project. Fall risk and the high cost of an amateur repair gone wrong (worse leaks within 12-24 months) put most chimney work decisively in professional territory.
Measure the chimney width on the side facing up the roof slope. If it's 30 inches or wider, the IRC requires a cricket or saddle on the upslope side. Many older Louisiana homes have wide chimneys without crickets — a missing cricket creates chronic water accumulation against the back of the chimney that overwhelms the flashing. If a chimney wider than 30 inches has chronic leaks at the back side, and missing cricket is the most likely cause.
Geometry First, Sealant Second
Chimney flashing failures get repeatedly misdiagnosed as sealant problems. The visible symptom is cracking caulk; the actual problem is usually that the layered metal geometry has shifted, lifted, or pulled out of its mortar anchor. A sealant-only response addresses the symptom without restoring the geometry, which is why the leak returns on roughly the same schedule every year. The repair that lasts 15+ years restores the metal assembly first and uses sealant only as the secondary barrier behind the geometry. Knowing the difference is what separates a permanent fix from an annual ritual.
