
How to Tarp a Roof Safely After a Storm (and When to Stop and Call a Pro)
A proper tarp installation buys 30-60 days of weatherproofing for $80-$150 in materials. A bad tarp installation lasts 3 days, voids the insurance claim, and adds thousands of dollars in interior damage. Two factors separate them: documenting the damage before tarping, and screwing the wood anchor strips through the tarp into the rafters — not into the shingles. Most DIY tarp failures come from skipping one or the other.
The rain stopped a few hours ago. Wind is still gusting through the trees, but it is safe to walk outside. There is a hole in the roof where a tree limb came down — or a section of shingles is gone — and the next squall line is forecast to roll through tomorrow afternoon. Something has to go on that roof tonight.
Tarping a roof after a storm is one of the few situations where DIY actually makes sense. Materials cost less than dinner out. The technique is straightforward. And the typical post-storm Northshore roofer queue runs 5-7 days after any major event — a long time to take on more interior damage when an active leak goes uncovered. Here is how to do it right — and the line where DIY stops being smart.
Document the Damage Before Climbing Anywhere
Before the tarp comes out of the garage, take photos. Wide shots showing the whole roof. Close-ups of the damaged area. Photos of any debris on the lawn (tree limbs, missing shingles, displaced flashing). Interior photos of any active leaks, ceiling stains, or water on floors. Date-stamped if the phone supports it. Video the damage with audio narration — the date and time on the file metadata become evidence.
Why this matters: A tarp that goes up before the adjuster sees the damage looks like preventive maintenance to the insurer, not storm damage. The cause becomes ambiguous. The claim weakens. Documentation before the tarp goes on is what protects the insurance payout coming behind it.
For roofs with active damage from a named hurricane or tropical storm, file the insurance claim before tarping. Most Louisiana policies require notice within 30-90 days of the loss event, and some require initial notice within 24-48 hours for emergency mitigation coverage. Tarping is itself a covered emergency mitigation expense — but only if the damage that triggered it is documented and reported.
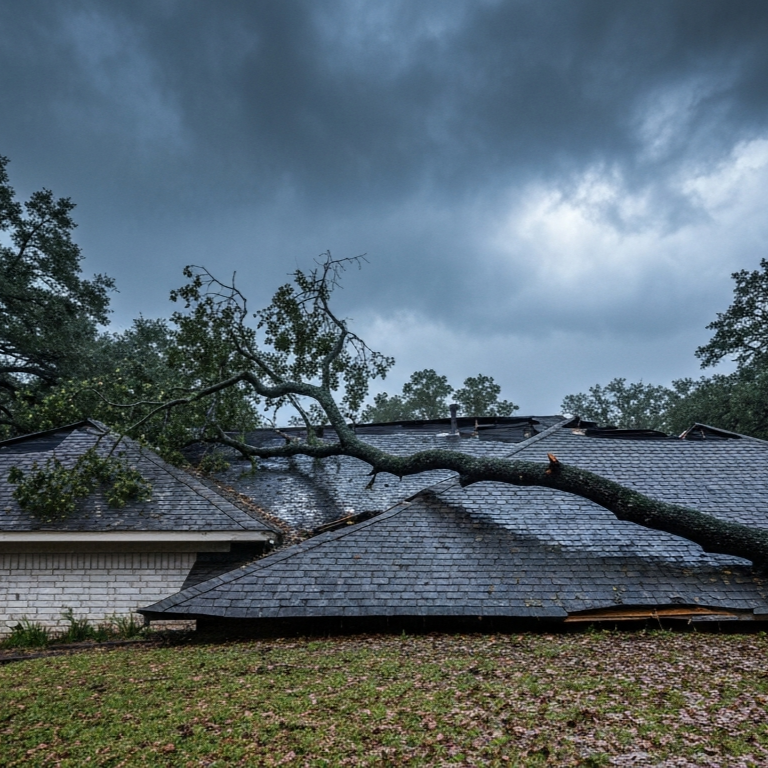
Emergency roof tarp covering storm-damaged Louisiana home after fallen tree impact to prevent additional rainwater intrusion and structural damage.
When DIY Tarping Is Not the Move
Tarping is one of the few storm responses where DIY makes sense — but not always. Five conditions call for stopping and getting someone with the right equipment.
Anything above one story. Two-story Northshore homes are 18-22 feet to the eave. A fall from that height is the leading cause of post-storm DIY ER visits in Louisiana. Pros use Personal Fall Arrest Systems for any work above 6 feet, per OSHA. Most homeowners do not own one.
Active wind. Gusts of 25+ mph fight the tarp the entire time and produce a sloppy install. Wait for a calm window. Most tropical storm passings have a rain-and-wind backside; the calm hour after the storm is the install window.
Active lightning. Audible thunder means striking range. Stay off the roof.
Slope steeper than 6/12. Standard architectural homes in Louisiana are typically 4/12 to 8/12. Anything 6/12 or steeper requires harness fall protection per OSHA when the eave height exceeds 6 feet, which applies to virtually every two-story residential roof. A roof too steep to stand on comfortably without sliding is past DIY territory.
Roof material other than asphalt shingles. Slate, clay tile, asbestos, and concrete tile roofs can crack under foot traffic and do not accept screw fasteners cleanly. Even FEMA's Operation Blue Roof program will not tarp these — they require specialty crews and different methods.
Two options exist while waiting for a roofer when DIY tarping is off the table: call the insurance carrier's emergency hotline (most have one for catastrophes) or contact FEMA's Operation Blue Roof if the area is in a federally declared disaster zone. Operation Blue Roof is covered in detail in the next section.
Materials Checklist (with Costs)
Total material cost runs $80-$150 for a typical residential tarp install. Worth picking up during hurricane prep season — the alternative is fighting other homeowners at Lowe's the day after the storm.
| Material | Specification + Cost |
|---|---|
| Tarp | Heavy-duty 6-mil polyethylene minimum (8-mil for hurricane regions). Size: 3 ft beyond damage on all sides. Typical 12'×16' or 16'×20'. $25-$60. |
| 1×2 or 2×4 wood furring strips | Two strips at least as long as each side of the tarp. Pressure-treated preferred. $8-$20. |
| 3-inch deck screws or roofing nails | Box of 50+. Deck screws hold better than nails in wind. $10-$15. |
| Cordless drill / impact driver | Already own one ideally. $50-$100 if not. |
| Utility knife | For trimming tarp. $5. |
| Sturdy ladder | Tall enough to step onto the roof, not stretch up to it. $80-$150 if needed. |
| Work gloves and slip-resistant shoes | Already own ideally. $15-$30. |
| Phone or camera | For documentation photos. Already own. |
How to Tarp a Roof Step by Step
Step 1 — Wait for safe conditions
The storm passed. Lightning gone. Wind under 20 mph. Daylight. If any of those are missing, wait. A bucket inside catching a leak for 6 more hours is better than a fall from a wet roof.
Step 2 — Document everything
Photos before climbing. Photos of the damaged area from the ground with zoom. Wide shots of the house. Anything on the ground that came off the roof. (See the section above — this is the single most important step.)
Step 3 — Clear debris from the roof
Loose shingles, tree limbs, gutter debris. Anything that could trip a foot up there or get caught under the tarp. A roof rake from the ground handles the smaller stuff within reach.
Step 4 — Position the tarp
Lay the tarp so it covers the damaged area with at least 3 feet of overlap on all four sides. The tarp runs from the ridge (peak) down toward the eave (edge), so water flows over the tarp the way it would flow over shingles. For damage near the ridge, the top edge of the tarp must extend over the ridge so wind-driven rain cannot get under it.
Step 5 — Anchor with wood strips
This is the step that separates real tarps from blow-off tarps. Lay a 1×2 or 2×4 wood furring strip along each edge of the tarp. Roll the tarp edge over the wood strip once (so the tarp wraps around the wood). Then drive 3-inch deck screws through the wood strip, through the tarp, through the shingles, into a rafter beneath. Screws need to bite into structural wood, not just decking. Space the screws every 12-18 inches along each strip.
Step 6 — Slope for drainage
Walk around the tarp and check that water will flow off the tarp toward the eave, not pool in the middle or run sideways into damaged areas. If the tarp sags anywhere, add a second wood strip across the middle to lift it slightly. Pooled water on a tarp doubles its weight in a single rain — that is how mid-tarp blowouts happen.
Step 7 — Trim and check
Trim any tarp overhang that flaps in the wind — flapping is what works the screws loose over time. Walk the perimeter once more and confirm every wood strip is anchored to the rafter below, not just to a shingle.
Do not drive screws into the gutter, drip edge, or fascia board only. Those are not structural wood. Screws must bite into a rafter or roof truss. Standard rafter spacing on Louisiana homes is 16 or 24 inches on center starting from the gable end. A small magnetic stud finder helps identify them through the shingles.
The 5 Mistakes That Make DIY Tarps Blow Off
Every blown-off tarp Epic gets called to fix has one or more of these problems. Avoiding them is half the battle.
1. Anchoring the tarp to shingles instead of rafters: Shingles are nailed to decking; decking is nailed to rafters. Wind that lifts a tarp anchored only to shingles can rip both off together. Always screw into the rafter beneath.
2. Tarp running the wrong direction: Water flows downhill. A tarp installed with the seam running across the slope (instead of down the slope) creates a dam that catches water and channels it underneath the tarp. The leak it was supposed to stop now affects 4× the area.
3. Bricks, sandbags, or weights instead of anchors: Wind under a tarp generates lift like an airplane wing. A 30-pound brick on each corner will not hold against a 40-mph gust. Mechanical fasteners through wood strips are the only thing that holds.
4. Tarp too small: A tarp that just barely covers the damage will lift at the edges in any wind. The rule is 3 feet of overlap on all sides, minimum. Buy the larger tarp.
5. Skipping the wood furring strips: Some DIY guides show tarps anchored with just screws directly through the tarp grommets. Grommets tear out under load. The wood strip distributes the load along the entire edge and is what holds in serious wind.
FEMA Operation Blue Roof — Free Federal Tarp Installation
After a federally declared disaster, the U.S. Army Corps of Engineers runs a free tarping program called Operation Blue Roof. Eligible homeowners get fiber-reinforced sheeting installed by Corps-managed contractors, designed to last roughly 30 days while permanent repairs get scheduled. There is no cost to the homeowner.
The program activates only when FEMA assigns the mission to USACE, usually after a major hurricane or storm with widespread roof damage. Hurricane Ida (2021), Hurricane Laura (2020), and Hurricane Francine (2024) all triggered Operation Blue Roof in Louisiana.
Eligibility (per USACE)
Primary residence (not vacation or rental property). No more than 50% of the roof framing damaged. The applicant must certify ownership (or have written renter permission) and be sheltering in the home. The roof must be standard asphalt shingles, metal, or similar material that accepts nail-installed sheeting. Slate, clay tile, asbestos, and similar materials are not eligible — Operation Blue Roof crews cannot install on them safely.
How to sign up
When the program is active, USACE publishes sign-up details at usace.army.mil. The homeowner completes a Right of Entry form authorizing the Corps to access the property. There is no charge — anyone trying to charge for Operation Blue Roof services is committing fraud. Report to the FEMA Disaster Fraud Hotline at 1-866-720-5721.
Operation Blue Roof tarps and FEMA self-help blue tarps are different things. Operation Blue Roof uses heavier fiber-reinforced sheeting installed by contractors. FEMA self-help tarps are thinner blue plastic distributed for homeowners to install themselves at municipal pickup points. Both are free. Operation Blue Roof lasts longer; the self-help tarps are a faster stopgap if Operation Blue Roof is not available in the area or the homeowner does not qualify.
How Long a Tarp Actually Lasts
A properly installed tarp lasts 30-60 days in Louisiana weather. UV breaks down polyethylene tarps surprisingly fast in the Gulf Coast sun — 90 days is optimistic, 120 days is rare. Heavier 8-mil tarps last longer than the standard 6-mil. Pre-treated tarps marketed as "UV-resistant" add maybe 30 days.
Operation Blue Roof's fiber-reinforced sheeting is built for ~30 days specifically because of this UV breakdown problem. Tarps are not long-term solutions. Schedule the permanent repair within the first 30 days and treat anything beyond that as borrowed time.
Watch for: Tarp edges fraying, color fading from bright blue to gray-blue, and screws loosening as the tarp shrinks slightly in the heat. Any of those signals time for either a re-tarp or a permanent repair.
Frequently Asked Questions
30-60 days for a properly installed 6-mil tarp in Louisiana sun. Longer with 8-mil or UV-treated tarps. UV degradation is the limiting factor — Gulf Coast sun is harsh on polyethylene.
Light rain is technically possible, but the install will be sloppy and dangerous. Wait for the rain to stop and the roof to dry slightly. With lightning in the area, do not climb up under any conditions.
Most Louisiana homeowners policies cover emergency mitigation expenses, including tarp materials and reasonable temporary protection costs. Save the receipts and photograph the tarp install. Submit with the claim. Coverage limits vary — confirm with the agent or check the declarations page.
Depends on the weather forecast and how much water is coming through. A small one-time leak from a passing storm with clear weather ahead can wait for a roofer with a bucket inside. An active drip with more rain in the next 24-48 hours needs a tarp.
No. Permits are required for permanent roof work, not for emergency temporary protection. Tarping is treated as emergency mitigation and is not subject to permit requirements in any Louisiana parish.
Common after Louisiana hurricanes — the entire industry queue fills within hours of a major event. Options: DIY tarp for 30 days, sign up for FEMA Operation Blue Roof if the area is in a federal disaster declaration, or call multiple roofers and accept the first available appointment. Calling until someone has a slot beats waiting passively.
Generally, yes — heavier sheeting, professional install, same lifespan or longer. The catch is qualification, program activation in the area, and a sign-up-to-install wait of 1-3 weeks depending on the event scale. A safely-installed DIY tarp in the first 24 hours bridges the gap. Sign up for Operation Blue Roof afterward for a more durable interim solution.
Tarp It Right or Don't Tarp It At All
A tarp that holds for 30 days saves the home. A tarp that blows off in the next storm makes the original damage worse and gives the carrier a reason to question the original claim. The difference is technique, not luck. Document first. Anchor through wood strips into the rafters. Slope for drainage. Any condition that makes DIY unsafe — height, wind, lightning, roof material — calls for the pros. The tarp can wait six hours; an ER visit cannot be undone.